Mask-RCNNをCPU/GPUで実行する
Mask-RCNNをCPU/GPUで実行する
Tensorflow+kerasで実装されたMask-RCNNを試した。
https://github.com/matterport/Mask_RCNN
実行環境はdockerで構築した。
実行環境
- OS:Ubuntu18.04
- CPU:Intel® Core™ i5-3470 CPU @ 3.20GHz × 4
- MEM:11.7 GiB
- GPU:GeForce GT 1030/PCIe/SSE2
docker version
- docker-ce 18.09.6
- nvidia-docker2
- nvidia-driver 430.14
docker環境構築は以下を参照ください。
1. リポジトリの取得
# 専用のディレクトリとdockerfile用ディレクトリを作成
mkdir -p ~/Run_MaskRcnn/{docker_build_cpu,docker_build_gpu}
cd Run_MaskRcnn/
git clone https://github.com/matterport/Mask_RCNN.git
2. dockerfile作成
CPU版
格納先:Run_MaskRcnn/docker_build_cpu/dockerfile
# Container for running /matterport/Mask_RCNN
# https://github.com/matterport/Mask_RCNN

FROM ubuntu:16.04
LABEL maintainer="https://www.kinacon-blog.work"

#
# Python 3 & libgtk2.0
#
RUN apt update && apt install -y --no-install-recommends \
    python3.5 \
    python3.5-dev \
    python3-pip \
    python3-tk \
    libgtk2.0-dev \
    build-essential \
 && rm -rf /var/lib/apt/lists/* \
 && pip3 install --no-cache-dir --upgrade pip setuptools

#
# Mask_RCNN/requirements.txt
#
RUN pip3 --no-cache-dir install \
    numpy \
    scipy \
    Pillow \
    cython \
    matplotlib \
    scikit-image \
    tensorflow \
    keras \
    opencv-python \
    h5py \
    imgaug \
    IPython[all]

#
# Jupyter Notebook
#
# Allow access from outside the container, and skip trying to open a browser.
# NOTE: disable authentication token for convenience. DON'T DO THIS ON A PUBLIC SERVER.
RUN pip3 --no-cache-dir install jupyter \
 && mkdir /root/.jupyter \
 && echo "c.NotebookApp.ip = '0.0.0.0'" \
         "\nc.NotebookApp.open_browser = False" \
         "\nc.NotebookApp.token = ''" \
    > /root/.jupyter/jupyter_notebook_config.py
EXPOSE 8888

#
# PyCocoTools
#
RUN pip3 install --no-cache-dir pycocotools

WORKDIR /host

CMD ["/bin/bash"]
GPU版
格納先:Run_MaskRcnn/docker_build_gpu/dockerfile
# Container for running /matterport/Mask_RCNN
# https://github.com/matterport/Mask_RCNN

FROM nvidia/cuda:10.0-cudnn7-devel-ubuntu16.04
LABEL maintainer="https://www.kinacon-blog.work"

#
# Python 3 & libgtk2.0
#
RUN apt update && apt install -y --no-install-recommends \
    python3.5 \
    python3.5-dev \
    python3-pip \
    python3-tk \
    libgtk2.0-dev \
 && rm -rf /var/lib/apt/lists/* \
 && pip3 install --no-cache-dir --upgrade pip setuptools

#
# Mask_RCNN/requirements.txt
#
RUN pip3 --no-cache-dir install \
    numpy \
    scipy \
    Pillow \
    cython \
    matplotlib \
    scikit-image \
    tensorflow-gpu \
    keras \
    opencv-python \
    h5py \
    imgaug \
    IPython[all]

#
# Jupyter Notebook
#
# Allow access from outside the container, and skip trying to open a browser.
# NOTE: disable authentication token for convenience. DON'T DO THIS ON A PUBLIC SERVER.
RUN pip3 --no-cache-dir install jupyter \
 && mkdir /root/.jupyter \
 && echo "c.NotebookApp.ip = '0.0.0.0'" \
         "\nc.NotebookApp.open_browser = False" \
         "\nc.NotebookApp.token = ''" \
    > /root/.jupyter/jupyter_notebook_config.py
EXPOSE 8888

#
# PyCocoTools
#
RUN pip3 install --no-cache-dir pycocotools

WORKDIR /host

CMD ["/bin/bash"]
3. コンテナー作成
CPU版
cd ~/Run_MaskRcnn/docker_build_cpu
docker build -t markrcnn/cpu .
GPU版
cd ~/Run_MaskRcnn/docker_build_gpu
docker build -t markrcnn/gpu .
4. 学習済み重みの取得
事前に取得しなくてもdemo.ipyndを実行すれば取得できる。 wgetで取得したほうが早かったので・・・
cd ~/Run_MaskRcnn/Mask_RCNN/
wget https://github.com/matterport/Mask_RCNN/releases/download/v2.0/mask_rcnn_coco.h5
5. jupyter notebook(コンテナー)起動
CPU版
docker run -it --rm \
-p 8888:8888 \
-v ~/Run_MaskRcnn/Mask_RCNN:/host \
maskrcnn/cpu jupyter notebook --allow-root /host
GPU版
docker run --runtime=nvidia -it --rm \
-p 8888:8888 \
-v ~/Run_MaskRcnn/Mask_RCNN:/host \
maskrcnn/gpu jupyter notebook --allow-root /host
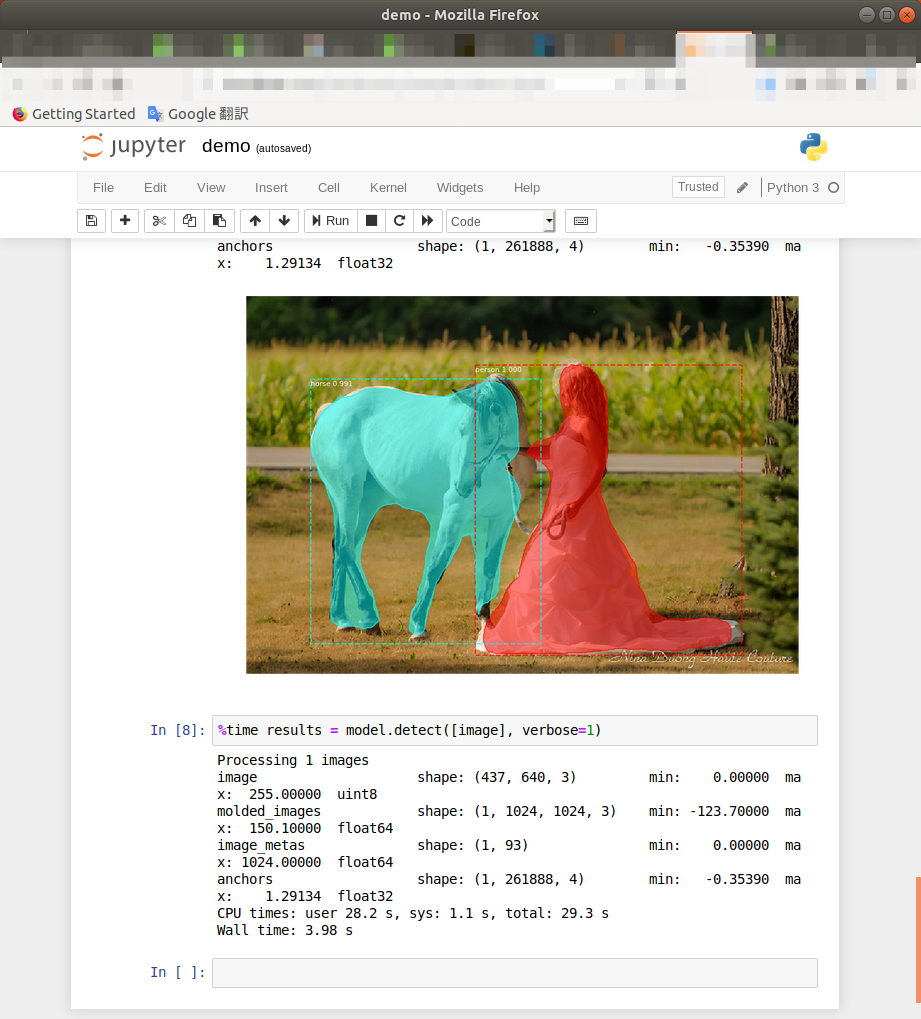
localhost:8888にアクセスして、jupyter notebookを開く samples/demo.ipynbを開いて、実行(▶▶)する。

処理時間の計測可能
%time or %timeit(10回の平均速度)を計測したい処理の前につければOK。
%time results = model.detect([image], verbose=1)
CPUのみでは1枚の処理に6secかかる。
GPUを使用すれば、1.5secでした。
CUDNN_STATUS_INTERNAL_ERROR が出た場合。
以下のエラーが出た。
E tensorflow/stream_executor/cuda/cuda_dnn.cc:334] Could not create cudnn handle: CUDNN_STATUS_INTERNAL_ERROR
対策
以下を追記して、GPUのメモリを必要な文だけ割り当てるよう設定すれば良いらしい。
~/Run_MaskRcnn/Mask_RCNN/mrcnn/model.py
tensorflowをimportしているmodel.pyの32行目に追記した。
config = tf.ConfigProto(gpu_options=tf.GPUOptions(allow_growth=True))
session = tf.Session(config=config)
K.tensorflow_backend.set_session(session)
以上。