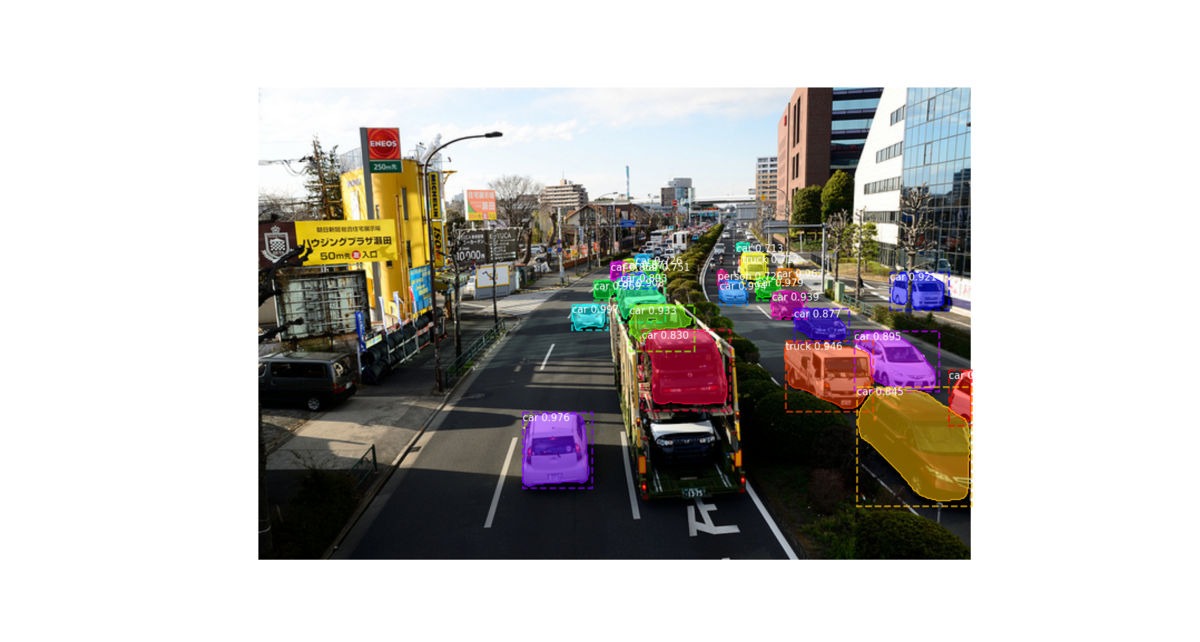
MaskRCNNを試してみた。
MaskRCNN-tensorflow-keras
- 20/05/06
- Ubuntu18.04.4
- GeForce RTX 2060
- Docker version 19.03.8
Ref
https://github.com/matterport/Mask_RCNN
1. 実行環境の構築
事前準備
- ローカルにリポジトリをクローンしてあとで編集可能にする。
- 学習済みweightsもローカルにダウンロードしておく。
# リポジトリをクローン
git clone https://github.com/matterport/Mask_RCNN
cd Mask_RCNN
sudo rm -r .git

# wightsをダウンロード
mkdir weights
wget -P ./weights https://github.com/matterport/Mask_RCNN/releases/download/v2.0/mask_rcnn_coco.h5
コンテナイメージの作成
- dockerfileからイメージをビルド
- https://github.com/matterport/Mask_RCNN#installationを参照
FROM nvidia/cuda:10.1-devel-ubuntu18.04
# FROM nvcr.io/nvidia/tensorflow:20.02-tf1-py3

ENV DEBIAN_FRONTEND=noninteractive \
    LC_ALL=C.UTF-8 \
    LANG=C.UTF-8

RUN apt update && apt install -y --no-install-recommends \
    git curl \
    python3-dev \
    python3-tk \
    libgtk2.0-dev \
    imagemagick \
 && rm -rf /var/lib/apt/lists/*

RUN curl https://bootstrap.pypa.io/get-pip.py -o get-pip.py \
 && python3 get-pip.py \
 && rm get-pip.py

# MaskRCNN requirements
WORKDIR /workspace
RUN git clone https://github.com/matterport/Mask_RCNN
WORKDIR /workspace/Mask_RCNN
# requirements.txtを修正
RUN sed -i -e 's/tensorflow>=1.3.0/tensorflow==1.3.0/g' requirements.txt \
 && sed -i -e 's/opencv-python/opencv-python==3.4.5.20/g' requirements.txt \
 && sed -i -e 's/keras>=2.0.8/keras==2.2.0/g' requirements.txt \
 && pip3 install -r requirements.txt \
 && python3 setup.py install

# coco pythonapi
RUN pip3 install pycocotools

WORKDIR /workspace
ENV QT_X11_NO_MITSHM=1
CMD ["/bin/bash"]
# dockerfileの作成
mkdir docker-build
cd docker-build
sudo gedit dockerfile # dockerfileを作成

# コンテナイメージのビルド
docker build -t maskrcnn-tensorflow/keras .
2. 推論用コードの作成
- demo.ipyndをpyコードに変換し、修正したdemo.pyを作成した。
- ipynd > py は
jupyter nbconvert --to script demo.ipynb
#!/usr/bin/env python
# coding: utf-8

# # Mask R-CNN Demo
#
# A quick intro to using the pre-trained model to detect and segment objects.

import os
import sys
import random
import math
import numpy as np
import skimage.io
import matplotlib
import matplotlib.pyplot as plt

# Root directory of the project
# ROOT_DIR = os.path.abspath("../")
ROOT_DIR = os.path.abspath("/workspace/Mask_RCNN")

# Import Mask RCNN
sys.path.append(ROOT_DIR)  # To find local version of the library
from mrcnn import utils
import mrcnn.model as modellib
from mrcnn import visualize

# Import COCO config
sys.path.append(os.path.join(ROOT_DIR, "samples/coco/"))  # To find local version
import coco

# Directory to save logs and trained model
MODEL_DIR = os.path.join(ROOT_DIR, "logs")

# Local path to trained weights file
# COCO_MODEL_PATH = os.path.join(ROOT_DIR, "mask_rcnn_coco.h5")
COCO_MODEL_PATH = os.path.join(ROOT_DIR, "weights/mask_rcnn_coco.h5")

# Download COCO trained weights from Releases if needed
if not os.path.exists(COCO_MODEL_PATH):
    utils.download_trained_weights(COCO_MODEL_PATH)

# Directory of images to run detection on
IMAGE_DIR = os.path.join(ROOT_DIR, "images")

# ## 1.Configurations

class InferenceConfig(coco.CocoConfig):
    # Set batch size to 1 since we'll be running inference on
    # one image at a time. Batch size = GPU_COUNT * IMAGES_PER_GPU
    GPU_COUNT = 1
    IMAGES_PER_GPU = 1

config = InferenceConfig()
config.display()


# ## 2.Create Model and Load Trained Weights

# Create model object in inference mode.
model = modellib.MaskRCNN(mode="inference", model_dir=MODEL_DIR, config=config)

# Load weights trained on MS-COCO
model.load_weights(COCO_MODEL_PATH, by_name=True)


# ## 3.Class Names

# COCO Class names
# Index of the class in the list is its ID.
# For example, to get ID of the teddy bear class,
# use: class_names.index('teddy bear')
class_names = ['BG', 'person', 'bicycle', 'car', 'motorcycle', 'airplane',
               'bus', 'train', 'truck', 'boat', 'traffic light',
               'fire hydrant', 'stop sign', 'parking meter', 'bench', 'bird',
               'cat', 'dog', 'horse', 'sheep', 'cow', 'elephant', 'bear',
               'zebra', 'giraffe', 'backpack', 'umbrella', 'handbag', 'tie',
               'suitcase', 'frisbee', 'skis', 'snowboard', 'sports ball',
               'kite', 'baseball bat', 'baseball glove', 'skateboard',
               'surfboard', 'tennis racket', 'bottle', 'wine glass', 'cup',
               'fork', 'knife', 'spoon', 'bowl', 'banana', 'apple',
               'sandwich', 'orange', 'broccoli', 'carrot', 'hot dog', 'pizza',
               'donut', 'cake', 'chair', 'couch', 'potted plant', 'bed',
               'dining table', 'toilet', 'tv', 'laptop', 'mouse', 'remote',
               'keyboard', 'cell phone', 'microwave', 'oven', 'toaster',
               'sink', 'refrigerator', 'book', 'clock', 'vase', 'scissors',
               'teddy bear', 'hair drier', 'toothbrush']


# ## 4.Run Object Detection

# Load a random image from the images folder
file_names = next(os.walk(IMAGE_DIR))[2]
image = skimage.io.imread(os.path.join(IMAGE_DIR, random.choice(file_names)))

# Run detection
results = model.detect([image], verbose=1)

# Visualize results
r = results[0]
visualize.display_instances(image, r['rois'], r['masks'], r['class_ids'],
                            class_names, r['scores'])
3. 推論を試行
- コンテナを起動して実行
# コンテナを起動
# cd Mask_RCNN
xhost +
docker run -it --rm --gpus all \
            -e DISPLAY=$DISPLAY \
            -v /tmp/.X11-unix:/tmp/.X11-unix \
            -v /etc/group:/etc/group:ro \
            -v /etc/passwd:/etc/passwd:ro \
            -u $(id -u $USER):$(id -g $USER) \
            -v $PWD:/workspace/Mask_RCNN \
            -w /workspace/Mask_RCNN \
            maskrcnn-tensorflow/keras

# 推論を試行
cd sample
python3 demo.py
結果画像例

以上。