Nvidia driverのインストール
前回からの更新です。
環境
Ubuntu 18.04
GeForce GT 1030/PCIe/SSE2
1. インストールスクリプトの入手
以下より、該当GPUのドライバーを入手する。
今回ダウンロードしたファイルはこれでした。
NVIDIA-Linux-x86_64-430.14.run
2. 必須パッケージのインストール
sudo apt update
sudo apt install build-essential
3. 既存のグラフィックスドライバーの停止
設定ファイル作成
cat << EOF | sudo tee /etc/modprobe.d/blacklist-nouveau.conf
blacklist nouveau
options nouveau modeset=0
EOF
設定の反映
sudo update-initramfs -u
sudo reboot
4. インストールスクリプトの実行
cd Downloads
sudo chmod +x NVIDIA-Linux-x86_64-430.14.run
sudo ./NVIDIA-Linux-x86_64-430.14.run
終わったら再起動でOK。
以上
Mask-RCNNをCPU/GPUで実行する
Mask-RCNNをCPU/GPUで実行する
Tensorflow+kerasで実装されたMask-RCNNを試した。
https://github.com/matterport/Mask_RCNN
実行環境はdockerで構築した。
実行環境
- OS:Ubuntu18.04
- CPU:Intel® Core™ i5-3470 CPU @ 3.20GHz × 4
- MEM:11.7 GiB
- GPU:GeForce GT 1030/PCIe/SSE2
docker version
- docker-ce 18.09.6
- nvidia-docker2
- nvidia-driver 430.14
docker環境構築は以下を参照ください。
1. リポジトリの取得
# 専用のディレクトリとdockerfile用ディレクトリを作成
mkdir -p ~/Run_MaskRcnn/{docker_build_cpu,docker_build_gpu}
cd Run_MaskRcnn/
git clone https://github.com/matterport/Mask_RCNN.git
2. dockerfile作成
CPU版
格納先:Run_MaskRcnn/docker_build_cpu/dockerfile
# Container for running /matterport/Mask_RCNN
# https://github.com/matterport/Mask_RCNN

FROM ubuntu:16.04
LABEL maintainer="https://www.kinacon-blog.work"

#
# Python 3 & libgtk2.0
#
RUN apt update && apt install -y --no-install-recommends \
    python3.5 \
    python3.5-dev \
    python3-pip \
    python3-tk \
    libgtk2.0-dev \
    build-essential \
 && rm -rf /var/lib/apt/lists/* \
 && pip3 install --no-cache-dir --upgrade pip setuptools

#
# Mask_RCNN/requirements.txt
#
RUN pip3 --no-cache-dir install \
    numpy \
    scipy \
    Pillow \
    cython \
    matplotlib \
    scikit-image \
    tensorflow \
    keras \
    opencv-python \
    h5py \
    imgaug \
    IPython[all]

#
# Jupyter Notebook
#
# Allow access from outside the container, and skip trying to open a browser.
# NOTE: disable authentication token for convenience. DON'T DO THIS ON A PUBLIC SERVER.
RUN pip3 --no-cache-dir install jupyter \
 && mkdir /root/.jupyter \
 && echo "c.NotebookApp.ip = '0.0.0.0'" \
         "\nc.NotebookApp.open_browser = False" \
         "\nc.NotebookApp.token = ''" \
    > /root/.jupyter/jupyter_notebook_config.py
EXPOSE 8888

#
# PyCocoTools
#
RUN pip3 install --no-cache-dir pycocotools

WORKDIR /host

CMD ["/bin/bash"]
GPU版
格納先:Run_MaskRcnn/docker_build_gpu/dockerfile
# Container for running /matterport/Mask_RCNN
# https://github.com/matterport/Mask_RCNN

FROM nvidia/cuda:10.0-cudnn7-devel-ubuntu16.04
LABEL maintainer="https://www.kinacon-blog.work"

#
# Python 3 & libgtk2.0
#
RUN apt update && apt install -y --no-install-recommends \
    python3.5 \
    python3.5-dev \
    python3-pip \
    python3-tk \
    libgtk2.0-dev \
 && rm -rf /var/lib/apt/lists/* \
 && pip3 install --no-cache-dir --upgrade pip setuptools

#
# Mask_RCNN/requirements.txt
#
RUN pip3 --no-cache-dir install \
    numpy \
    scipy \
    Pillow \
    cython \
    matplotlib \
    scikit-image \
    tensorflow-gpu \
    keras \
    opencv-python \
    h5py \
    imgaug \
    IPython[all]

#
# Jupyter Notebook
#
# Allow access from outside the container, and skip trying to open a browser.
# NOTE: disable authentication token for convenience. DON'T DO THIS ON A PUBLIC SERVER.
RUN pip3 --no-cache-dir install jupyter \
 && mkdir /root/.jupyter \
 && echo "c.NotebookApp.ip = '0.0.0.0'" \
         "\nc.NotebookApp.open_browser = False" \
         "\nc.NotebookApp.token = ''" \
    > /root/.jupyter/jupyter_notebook_config.py
EXPOSE 8888

#
# PyCocoTools
#
RUN pip3 install --no-cache-dir pycocotools

WORKDIR /host

CMD ["/bin/bash"]
3. コンテナー作成
CPU版
cd ~/Run_MaskRcnn/docker_build_cpu
docker build -t markrcnn/cpu .
GPU版
cd ~/Run_MaskRcnn/docker_build_gpu
docker build -t markrcnn/gpu .
4. 学習済み重みの取得
事前に取得しなくてもdemo.ipyndを実行すれば取得できる。 wgetで取得したほうが早かったので・・・
cd ~/Run_MaskRcnn/Mask_RCNN/
wget https://github.com/matterport/Mask_RCNN/releases/download/v2.0/mask_rcnn_coco.h5
5. jupyter notebook(コンテナー)起動
CPU版
docker run -it --rm \
-p 8888:8888 \
-v ~/Run_MaskRcnn/Mask_RCNN:/host \
maskrcnn/cpu jupyter notebook --allow-root /host
GPU版
docker run --runtime=nvidia -it --rm \
-p 8888:8888 \
-v ~/Run_MaskRcnn/Mask_RCNN:/host \
maskrcnn/gpu jupyter notebook --allow-root /host
localhost:8888にアクセスして、jupyter notebookを開く samples/demo.ipynbを開いて、実行(▶▶)する。
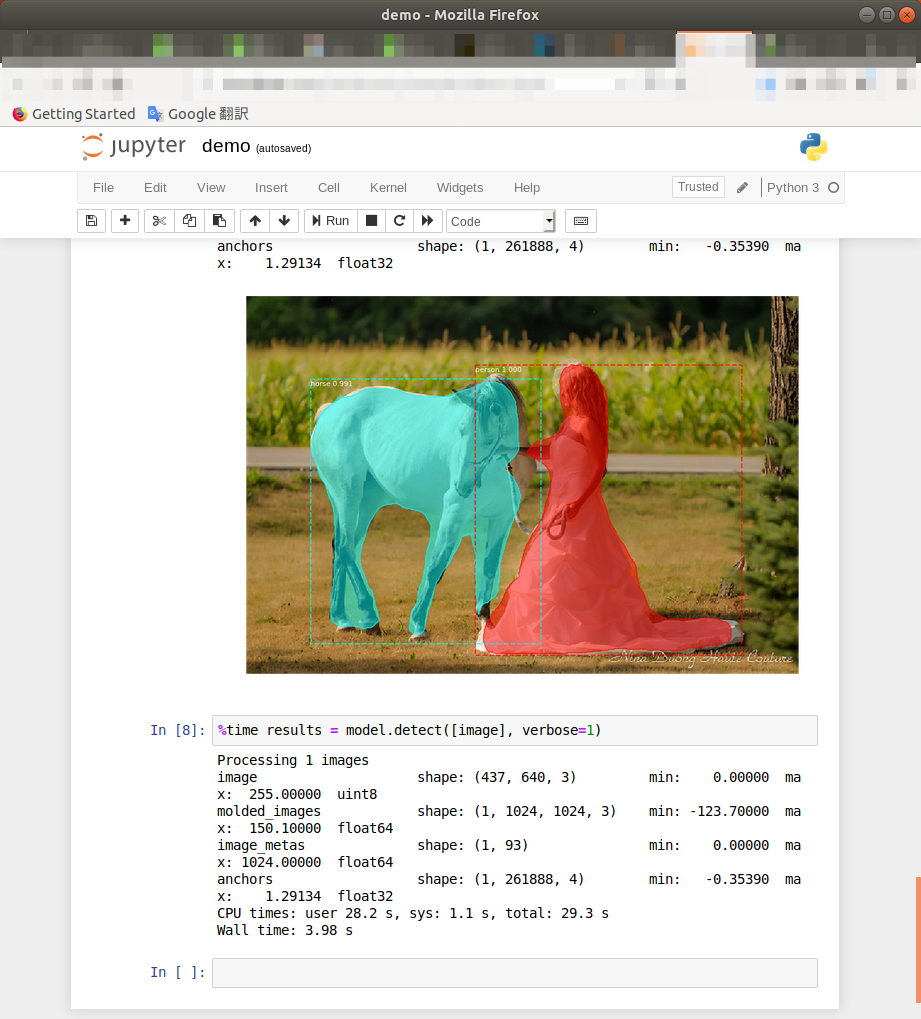
処理時間の計測可能
%time or %timeit(10回の平均速度)を計測したい処理の前につければOK。
%time results = model.detect([image], verbose=1)
CPUのみでは1枚の処理に6secかかる。
GPUを使用すれば、1.5secでした。
CUDNN_STATUS_INTERNAL_ERROR が出た場合。
以下のエラーが出た。
E tensorflow/stream_executor/cuda/cuda_dnn.cc:334] Could not create cudnn handle: CUDNN_STATUS_INTERNAL_ERROR
対策
以下を追記して、GPUのメモリを必要な文だけ割り当てるよう設定すれば良いらしい。
~/Run_MaskRcnn/Mask_RCNN/mrcnn/model.py
tensorflowをimportしているmodel.pyの32行目に追記した。
config = tf.ConfigProto(gpu_options=tf.GPUOptions(allow_growth=True))
session = tf.Session(config=config)
K.tensorflow_backend.set_session(session)
以上。
git pullで更新履歴をローカルリポジトリに反映させる。

別のユーザー(別のPCでもいい)がリモートリポジトリを更新しており
その更新履歴を自分のPCに反映させたい場合にはプルを使う。
| 実行環境 | ver |
|---|---|
| Ubuntu | 18.04.2 LTS |
| GIT | 2.17.1 |
$ git pull origin master

> Username for 'https://github.com': <user_name>
> Password for 'https://<user_name>@github.com': <password>

> remote: Enumerating objects: 11, done.
> remote: Counting objects: 100% (11/11), done.
> remote: Compressing objects: 100% (3/3), done.
> remote: Total 8 (delta 5), reused 8 (delta 5), pack-reused 0
> Unpacking objects: 100% (8/8), done.
> From https://github.com/kinacon711/github_private1-
>  * branch              master     -> FETCH_HEAD
>    d6530122..3ec8b27a  master     -> origin/master
> Updating d6530122..3ec8b27a
> Fast-forward
>  test.md    | 24 ++++++++++++++++++++++++
>  test2.md |  4 ++--
>  2 files changed, 26 insertions(+), 2 deletions(-)
>  create mode 100644 test3.md
以上。
git cloneでローカルリポジトリを登録する

github/外付けHDDなどに作成したリモートリポジトリをクローンして ローカルリポジトリにする。
| 実行環境 | ver |
|---|---|
| Ubuntu | 18.04.2 LTS |
| GIT | 2.17.1 |
githubの場合
# ローカルリポジトリとするディレクトリを作成する
$ mkdir test_github

# ディレクトリにgithubのリポジトリをクローンする
$ git clone https://github.com/<user_name>/<repogitory_name> test_github/

> Cloning into 'test_github'...
> Username for 'https://github.com': <user_name>
> Password for 'https://<user_name>@github.com':<password>

> remote: Enumerating objects: 17478, done.
> remote: Counting objects: 100% (17478/17478), done.
> remote: Compressing objects: 100% (11139/11139), done.
> remote: Total 17478 (delta 6097), reused 17475 (delta 6094), pack-reused 0
> Receiving objects: 100% (17478/17478), 738.25 MiB | 2.80 MiB/s, done.
> Resolving deltas: 100% (6097/6097), done.
> Checking out files: 100% (21152/21152), done.
外付けHDDなどローカルディレクトリの場合
# ローカルリポジトリとするディレクトリを作成する
$ mkdir test_hdd

# ディレクトリにHDD内のリポジトリをクローンする
# HDD内のリポジトリのパス:/media/<user>/<HDD_name>/<repogitory_name>

$ git clone /media/<user>/<HDD_name>/<repogitory_name> test_hdd/
リモートリポジトリがclone元か確認する
URLもしくはPATHがクローン元と同じならOK
$ cd test_github or cd test_hdd
$ git remote -v

> origin URL or PATH (fetch)
> origin URL or PATH (push)
以上。
Visual Studio codeでgitを利用する。

VScodeでリポジトリのファイルを編集するときに
インタフェースからコミットやプッシュができる。
- commitはaddも同時にやってくれるから楽。
- GUIでできる。
| 実行環境 | ver |
|---|---|
| Ubuntu | 18.04.2 LTS |
| GIT | 2.17.1 |
| VSCODE | 1.33.1 |
前提
- gitのセットアップが完了している。
- 既にリポジトリがローカルにあり、リモートリポジトリが設定されている。
過去記事
- Gitのセットアップ
- リポジトリの設定
リポジトリのディレクトリを開いて編集する。
【File】 - 【Open Folder...】
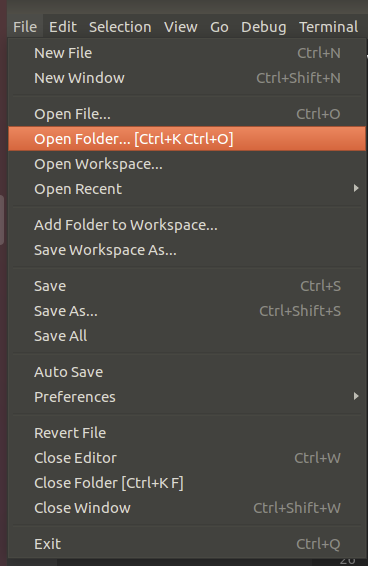
編集すると、「Source Control」に数字が表示される。

Source Controlからコミットする。
message欄にtagを入力して、チェックマークをするだけでaddとcommitができる。
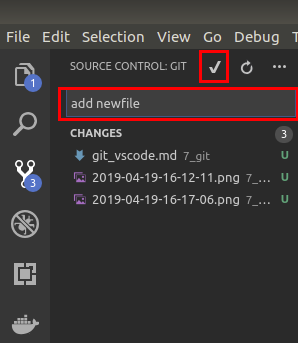
ファイルをセーブしてなくても、以下のように確認して実行してくれる。 Yes or Always
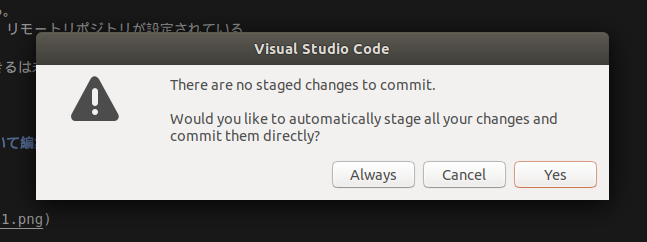
addしてcommitするか聞いてくる。 Yes or Always
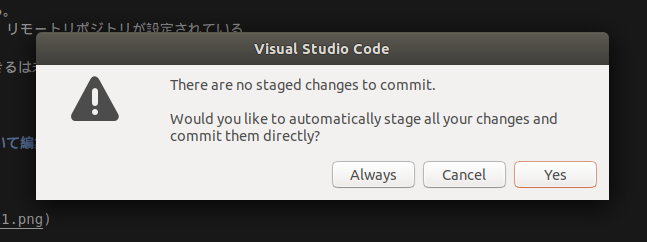
リポートリポジトリにプッシュする。
【・・・】をクリックするとコマンドが出てくる
【push to】を選択する
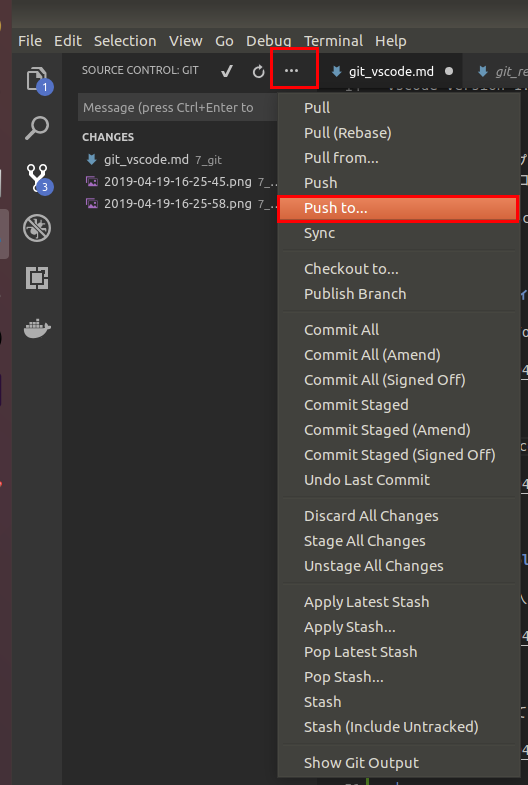
リモートリポジトリのエイリアスの入力
このあと、GitHubのリポジトリ場合はIDやPASSの入力が求められる。

リモートリポジトリのログを確認する。
ちゃんとプッシュされているようです。
# リモートリポジトリへ移動
$ cd /media/user/HDD500GB/code.git

# ログを確認する
$ git log
> commit a8cadf510ff7a79d540109a8c054af7c680a962c (HEAD -> master)
> Author:kinacon <www.kinacon-blog.work>
> Date:   Fri Apr 19 16:25:37 2019 +0900

>     add newfile

> commit ea7f1e476d21016a5d712df4328b6380c92d5483
> Author: kinacon <www.kinacon-blog.work>
> Date:   Fri Apr 19 15:40:22 2019 +0900

>     add test

> commit 9f18282ca87c0738df32140b226368ddaca5e271
> Author: kinacon <www.kinacon-blog.work>
> Date:   Fri Apr 19 15:09:50 2019 +0900

>    ver0.00


以上。
gitで外付けHDDにリモートリポジトリを作成する。

外付けHDDをリモートリポジトリにすることで - ネットワークに接続せずに共有できる。 - 容量はHDD次第で増やせる
前回、ローカルにリポジトリを作成済み。
今回はこのリポジトリを
外付けHDDに作成するリモートリポジトリにpush(アップロード)する。
最新の変更履歴を外付けHDDのリモートリポジトリにpushしておけば、
HDDの移動だけで別PCで引き続き作業ができる。
| 実行環境 | ver |
|---|---|
| Ubuntu | 18.04.2 LTS |
| GIT | 2.17.1 |
作業内容
リモートリポジトリの作成
リモートリポジトリ用のディレクトリ名は慣例として.gitをつけるようです。
init のオプションについて
- --bare : リモートリポジトリ(更新履歴情報だけもつ)と設定する。
- --share : グループで共有できるようにする。
# 外付けHDDへ移動
$ cd /media/user/HDD500GB/

# リモートリポジトリ用のディレクトリを作成
$ mkdir remote_repo.git

# リモートリポジトリを作成
$ cd remote_repo.git
$ git init --bare --share

> Initialized empty shared Git repository in /media/user/HDD500GB/
> remote_repo.git/
ローカルリポジトリのリモートリポジトリを設定する
【origin】はリモートリポジトリ(「/media/user/HDD500GB/remote_repo.git」)のエリアスになります。
# ローカルリポジトリへ移動
$ cd ~/git_test
$ git remote add origin /media/user/HDD500GB/remote_repo.git
リモートリポジトリとPATH/URLを確認
originというエイリアスとPATHが紐付いていることが確認できる
githubにリモートリポジトリを作っている場合はURLを使う。
$ git remote -v

> origin /media/user/HDD500GB/remote_repo.git (fetch)
> origin /media/user/HDD500GB/remote_repo.git (push)
リモートリポジトリにプッシュする
ローカルリポジトリの編集履歴を
リモートリポジトリ(origin)へpush(アップロード)する
【master】はリモートリポジトリのブランチのこと。
ブランチを作っていなければ、masterしかない。
※私はブランチを作って並行作業はしないのでブランチについては割愛します。
$ git push origin master

> Counting objects: 6, done.
> Delta compression using up to 8 threads.
> Compressing objects: 100% (3/3), done.
リモートリポジトリのlogを確認する
確認するとローカルリポジトリの履歴が反映されている。
# リモートリポジトリのディレクトリへ移動
$ cd /media/user/HDD500GB/remote_repo.git

$ git log
> commit b2427d3382cfe607f65bcb9398bca1393c20ede6 (HEAD -> master)
> Author: kinacon <www.kinacon-blog.work>
> Date:   Fri Apr 19 10:04:28 2019 +0900

>     second commit

> commit c928ba5dd08422cfa44393b667fe2712938566fc
> Author: kinacon <www.kinacon-blog.work>
> Date:   Thu Apr 18 15:25:53 2019 +0900

>     first commit
これでバックアップもOK。
以上。
Ubuntuでgitを始める

gitでできること
- ファイルの更新履歴を好きなときに残せる
- 編集前に戻せる
- 編集箇所の差分を表示できる
- 他人の編集したファイルを上書きする場合には警告が出る。
やったこと
| 実行環境 | ver |
|---|---|
| Ubuntu | 18.04.2 LTS |
| GIT | 2.17.1 |
作業内容
gitのインストール
aptでインストール
$ sudo apt install git
インストールの確認
$ git --version
初期設定
- 設定はホームディレクトリの.gitconfigに保存される。直接編集も可
- configコマンドで設定する
$ git config --global user.name "<任意のユーザ名>"
$ git config --global user.email "<任意のメールアドレス>"
確認方法
$ git config --global user.name
> kinacon
リポジトリの作成
リポジトリは、ファイルや更新履歴を保持するディレクトリ。 このディレクトリに置かれているファイルを管理できる。
ワークディレクトリの作成
$ mkdir git_test
作成したワークディレクトリをGit管理下(リポジトリ)にする
$ cd git_test
$ git init
> Initialized empty Git repository in /home/user/git_test/.git/
ls -aで隠しファイルを確認すると.gitが生成されている。
$ ls -a
> .  ..  .git
【 git status 】 リポジトリの状態を確認する
$ git status
> On branch master

> No commits yet

> nothing to commit (create/copy files and use "git add" to track)
ファイルをコミットする
ファイルを作成する
$ echo "# README" > README.md
statusを確認すると、
インデックス(履歴の追跡対象)に登録されていないファイルとして
「README.md」が表示される。
addしろと言われる。
$ git status
> On branch master

> No commits yet

> Untracked files:
>   (use "git add <file>..." to include in what will be committed)

>    README.md

> nothing added to commit but untracked files present (use "git add" to track)
【 git add 】 インデックスに登録する
$ git add README.md
statusを確認すると、README.mdが追加される。
$ git status
> On branch master

> No commits yet

> Changes to be committed:
>  (use "git rm --cached <file>..." to unstage)

>    new file:   README.md
【 git commit 】 コミットする
-m <"タグ">で更新を管理するタグをつけることができる。
$ git commit -m "first commit"
> [master (root-commit) c928ba5] first commit
> 1 file changed, 1 insertion(+)
> create mode 100644 README.md
statusを確認すると、
コミットされていないファイルはないことが確認できる。
$ git status
> On branch master
nothing to commit (working directory clean)
【git log】 リポジトリの更新履歴を確認する
git logは「q」で抜けられる
$ git log
>commit c928ba5dd08422cfa44393b667fe2712938566fc (HEAD -> master)
Author: kinacon <www.kinacon-blog.work>
Date:   Thu Apr 18 15:25:53 2019 +0900

    first commit
ファイルを更新してみる
リポジトリ管理下のREADME.mdを更新して、コミットしてみた。
テキストエディタで内容を更新した。
[更新したファイル]
# NAME

## Overview
<!-- 概要を書く -->

<br>

## Description
<!-- 詳細な説明を書く -->

<br>

## Requirements
<!-- ツールやライブラリの依存を書く -->

<br>

## Usage
<!-- 使い方を書く -->

<br>

## License
<!--  ライセンスを明示する -->
addして、commitする
$ git add README.md
$ git commit -m "second commit"

> [master b2427d3] second commit
> 1 file changed, 24 insertions(+), 1 deletion(-)
更新履歴を確認する
更新履歴が反映されているようです。
$ git log

> commit b2427d3382cfe607f65bcb9398bca1393c20ede6 (HEAD -> master)
> Author: kinacon <www.kinacon-blog.work>
> Date:   Fri Apr 19 10:04:28 2019 +0900

>    second commit

> commit c928ba5dd08422cfa44393b667fe2712938566fc
> Author: kinacon <www.kinacon-blog.work>
> Date:   Thu Apr 18 15:25:53 2019 +0900

>    first commit
これでローカルでファイルの更新履歴を管理しながら
作業できるようになりました。
以上。
UbuntuでローカルIPに接続中の機器を調べる。

- サーバーの固定IPを設定するために現在利用されているIPを確認したかった。
- いろいろな方法があるようだがarp-scanが簡単そうだった。
- aptで提供されるパッケージは古い(ver.1.8.1)、gitからソース(ver.1.9.5)を入手した。
実行環境
Ubuntu 16.04.6 LTS
実行内容
aptでインストールしてみた。
sudo apt install arp-scan
使用方法
arp-scan -I "NIC名" -l
NICはifconfigで確認する。
実行結果
Interface: enp0s25, datalink type: EN10MB (Ethernet)
Starting arp-scan 1.8.1 with 256 hosts (http://www.nta-monitor.com/tools/arp-scan/)
192.168.1.1   xx:xx:xx:xx:xx:xx (Unknown)
192.168.1.3   xx:xx:xx:xx:xx:xx (Unknown)
192.168.1.14  xx:xx:xx:xx:xx:xx (Unknown)
192.168.1.4   xx:xx:xx:xx:xx:xx (Unknown)
192.168.1.6   xx:xx:xx:xx:xx:xx (Unknown)
192.168.1.12  xx:xx:xx:xx:xx:xx (Unknown)
192.168.1.11  xx:xx:xx:xx:xx:xx (Unknown)
192.168.1.9   xx:xx:xx:xx:xx:xx (Unknown)
192.168.1.13  xx:xx:xx:xx:xx:xx (Unknown)

9 packets received by filter, 0 packets dropped by kernel
Ending arp-scan 1.8.1: 256 hosts scanned in 1.328 seconds (192.77 hosts/sec). 9 responded
左からIPアドレス、MACアドレス、NICの製造ベンダーとなっている。
製造ベンダーはすべて(Unknown)となった。
最新のarp-scanをインストールしてみた。
- 古いarp-scanの削除
sudo apt remove --purge arp-scan
- 必須パッケージのインストール
sudo apt install git autoconf libpcap-dev
- 最新のソースをコピー
git clone https://github.com/royhills/arp-scan.git
- インストール
cd arp-scan
autoreconf --install
./configure
make
sudo make install
reboot
実行結果
Interface: enp0s25, datalink type: EN10MB (Ethernet)
Starting arp-scan 1.9.5 with 256 hosts (https://github.com/royhills/arp-scan)
192.168.1.1   xx:xx:xx:xx:xx:xx NEC Platforms, Ltd.
192.168.1.3   xx:xx:xx:xx:xx:xx BUFFALO.INC
192.168.1.14  xx:xx:xx:xx:xx:xx (Unknown: locally administered)
192.168.1.4   xx:xx:xx:xx:xx:xx AzureWave Technology Inc.
192.168.1.6   xx:xx:xx:xx:xx:xx HUAWEI TECHNOLOGIES CO.,LTD
192.168.1.12  xx:xx:xx:xx:xx:xx HUAWEI TECHNOLOGIES CO.,LTD
192.168.1.10  xx:xx:xx:xx:xx:xx Apple, Inc.
192.168.1.11  xx:xx:xx:xx:xx:xx Nintendo Co.,Ltd
192.168.1.9   xx:xx:xx:xx:xx:xx Murata Manufacturing Co., Ltd.

9 packets received by filter, 0 packets dropped by kernel
Ending arp-scan 1.9.5: 256 hosts scanned in 2.191 seconds (116.84 hosts/sec). 9 responded
ベンダーが表示されるようになりました。
以上。